Breaking News
Main Menu
How To Download Audacity For Mac Book
вторник 27 ноября admin 85
How to Record Audio on Mac. Download Movavi Screen Capture Studio, launch the downloaded file, and follow the instructions on your screen. Unfortunately, it’s less easy to record music on Mac with Audacity, as you have to work through a complex web of system settings to enable system audio recording.
On Windows PC, you can record computer sound directly using Audacity. Unlike in Windows, recording internal audio on Mac using Audacity however requires extra software. If you are searching for the solution to record system audio or online music on Mac or MacBook, this guide is just for you. Do a search for Audacity with Bing or Google. Download and install Audacity, one of the most popular open source audio recorders and editors.
To record audio or music from internet using Audacity, you need to install a virtual sound card on Mac. We recommend which comes with free virtual sound card for Mac. Unlike other Mac virtual sound card software which is usually very tricky to setup. This one however is extremely straightforward. You can follow. Once you have configured the virtual sound card on your Mac or MacBook, recording internal sound using Audacity becomes really easy.
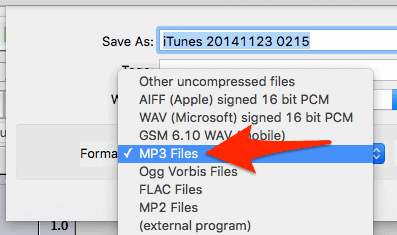
Open Audacity. Choose System Audio Recorder other than the Built-in Microphone as the recording device. Start recording your audio clip by pressing the Record button (a red circle in square). Click the Stop button to stop your audio recording. Optionally click the Play button to play the recorded audio in Audacity. If you decide to save the recorded system sound or streaming music, click File menu from the top menu bar, choose Export >> Export Audio, choose AIFF or other format you need from the File type box.
Optionally choose a name and location for the recording. Finally click Save. Now you know how to record streaming music from internet using Audacity, capture streaming audio from a website or just any sound playing through your sound card on Mac.
Word for mac 2011 macro toolbar. Can you tell me how can it be done? I would like to port the functionality to Mac users.
Best media streamer for mac. Audacity is free, open source software that makes it simple to record and edit audio on your computer. Installing Audacity on a MAC isn’t difficult, there’s an extra step that’s often overlooked if you want to save your recordings as MP3s, rather than much relatively large WAV files. To download Audacity, go to the Audacity downloads page () and choose the appropriate version. In this walkthrough, we’ll be looking at downloading and installing Audacity on your MAC. There are a few versions available for you to download, but we recommend you download the first.dmg file.
Depending on your browser and set-up, the file may automatically be saved to your downloads folder. If not, click SAVE FILE and choose a location on your computer where you’ll be able to locate the installer if necessary Double-click the downloaded DMG to mount it. Do not double-click the “Audacity” folder in the DMG window.
Drag the entire “Audacity” folder icon to the /Applications folder icon on the right (or to any other location of your choosing). Eject the DMG at bottom left of Finder, then launch Audacity.app from the “Audacity” folder in /Applications or from your chosen location. Known Issue: Security settings on OS X 10.7 or later may block Audacity being launched.
Most users on OS X 10.9.5 and later will experience this, due to changes made by Apple. To permanently enable Audacity launch, right-click or control-click on the Audacity application in Finder, choose “Open”, then in the dialog box that appears, choose “Open”. If exporting your recordings as rather large WAV files is sufficient, then you’re all set.
We recommend installing the LAME MP3 library, which will allow you to save your recordings as much smaller MP3 files. To download the LAME Library, launch Audacity. Then click EDIT, choose Preferences, select LIBRARIES, then under the MP3 Export Library section, click DOWNLOAD in the LAME MP3 Library line. Once the Lame Library mounts, double click the.pkg file to run the installer, then click Continue. Select your hard drive to install, click Continue, then Install.
Enter in your computers password if prompted, then click ok. Once it’s finished, click close to exit the installer. Now you’re ready to export your Audacity recordings to MP3 as well as WAV.