Breaking News
Main Menu
Create Windows 10 Bootable Usb On Mac For Pc
четверг 10 января admin 33
Last night I decided to do some spring cleaning and re install Windows 10 on my desktop. I attempted to use 'dd' to create a bootable USB drive from an ISO I had kicking around from the last time I purchased a copy of Windows 10.
5 days ago - If you are facing any kind of problem in your Mac or Windows PC and you want to create Windows 10/8/7 bootable USB on Mac, then this article.
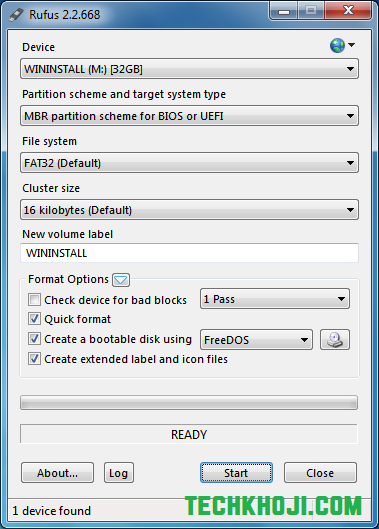
I ran my normal 'dd' command, waited 20 years for it to finish, popped the drive into my PC and booted it up. When I selected the USB drive from my boot options I got a blank screen, eventually booting back to my old Windows install. Next I tried using Rufus and this also did not work with UEFI. It was after a few minutes of poking around the internet that I found a method that was super easy and actually worked!
(Note:- Geometric shapes are otherwise available in the Insert ribbon) • Students studying mathematics might not be motivated to learn LaTeX because they might be able to get by with Equation Builder in Word to satisfy the vast majority of their needs. To obtain the math environment, click on 'Equation' on the 'Insert' ribbon on Windows or Word for Mac '16, or in 'Document Elements' on Word for Mac '11. Inserting an equation [ ] Microsoft Word has two different typing environments: text and math. However, when such a student reaches the limits, unlike LaTeX there is absolutely no recourse to expand the program to satisfy it. Keyboard shortcut for alpha symbol.
So you what you see? Share the LOVE! Emulators » Nintendo Gameboy Advance » Mac OS X. GBA Emulators for Mac OS X. Gba emulator mac sucks.
Below we will through this very easy process to turn a Windows ISO into a bootable USB drive that will work on modern motherboard running UEFI. Prepare USB Drive Before we copy over the contents of our ISO we need to identify and format our drive with the proper formatting. First we will use the 'diskutil' command to find out drive. Using the command below you should get output similar to the image below. Diskutil list Diskutil List Output In the output above you can see my USB drive is '/dev/disk2'. This is indicated by the size of the drive. Your output may very but, it should be easy to identify your USB drive.
In the rest of the tutorial, anywhere you see me use '/dev/disk2' or 'disk2' in a command, swap that out for your drive path from the output on your machine. Now that we know what number our drive is we need to format it using the MS-DOS type. This command will also setup the MBR (Master Boot Record) for the drive. The MBR is what tells your machine it can boot off of this drive.
Run the following command in your terminal, replacing 'disk2' with your drive number if it is different. Diskutil eraseDisk MS-DOS 'WINDOWS10' MBR disk2 Mount Your ISO Now that our USB drive is setup and ready to go, we need to mount our Windows ISO.
Once it is mounted in OSX we can use the 'cp' command to copy all of the files from our ISO onto our USB drive. To mount the ISO all you need to do is locate it in finder and double click the ISO. This will mount is and put it in finders side menu as shown below. Mounted Windows ISO Copy Files Once we mount our ISO we are ready to run the final command.

We will find out where our ISO is mounted and run the command to copy over all of the files. First to find the ISO location run the following command and look for the output shown below. Ls -al /Volumes/ Volumes You can see in the image above that our drive is called WINDOWS10(the name we specified when formatting it above) and our Windows 10 ISO is named w_10_pro_x64. To copy the files from our ISO to our drive we run the command below(replace any info that is different from your output). Cp -rp /Volumes/w_10_pro_x64/* /Volumes/WINDOWS10/ This command will take a while to complete(I've seen it run up to 30+ minutes in some scenarios.